Tuesday, November 30, 2010

How-To: Monogrammed Candle


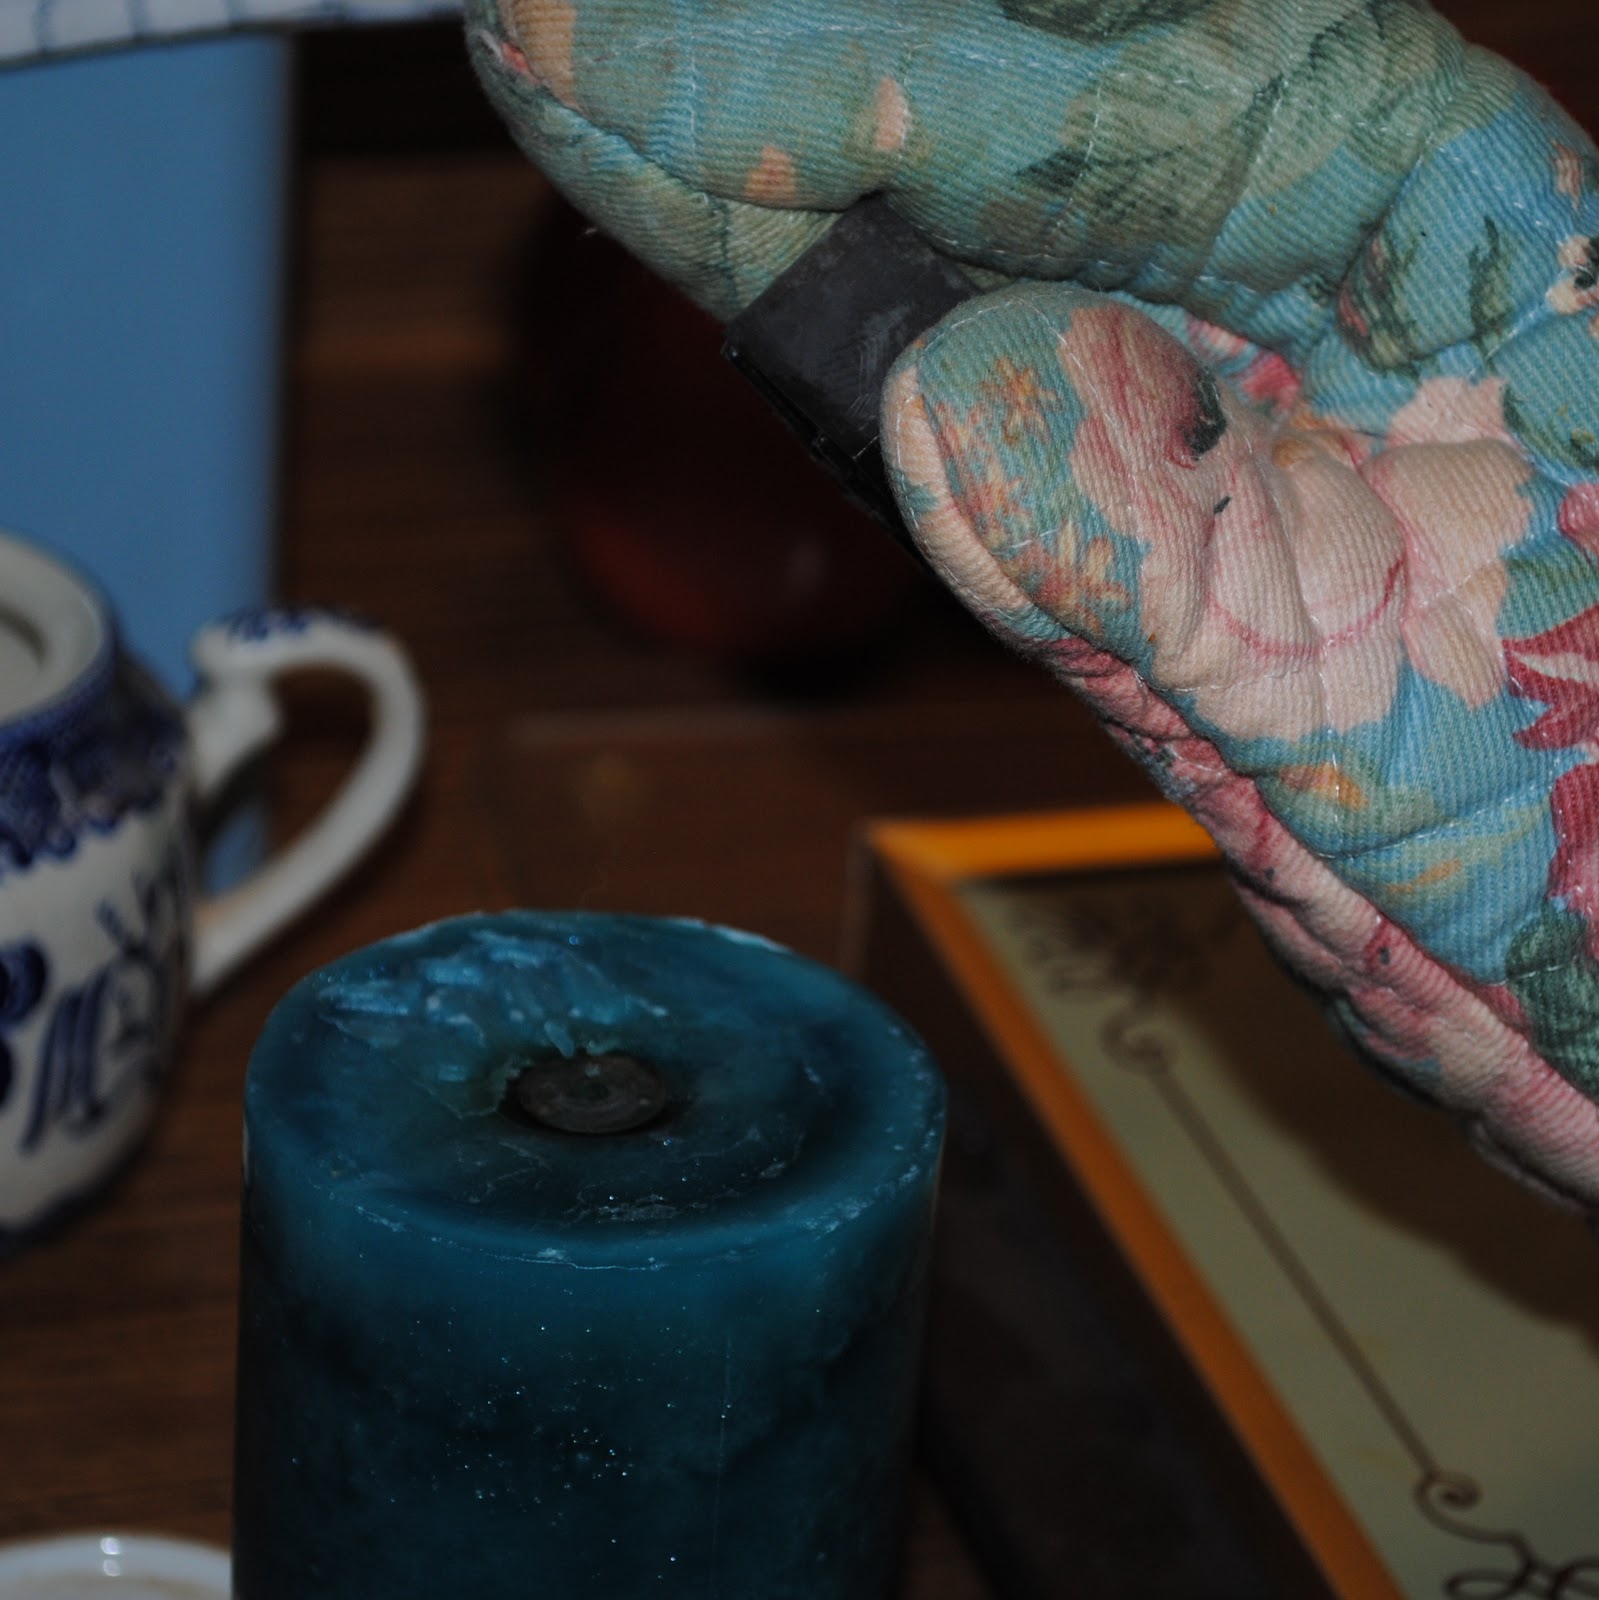
Monogram a pillar candle using vintage metal printer's type.


1. Place a metal letter face down on a warming plate for about 15 minutes. (Be careful not to heat metal type too much. You don't want to damage it.)


2. Prop your pillar candle on its side to keep it from rolling. Using an oven mitt, firmly press the letter into the candle.  You may need to rock wide letters to get the full impression.


Tip: You may want to test the letter on the bottom of the candle.  Just make sure that you fully reheat the letter before monogramming the side of the candle


3. Optional: Use Rub 'n Buff to highlight the letter.

Monday, November 29, 2010

Design Inspiration: Retro Fabulous


We here at DIgenY love a good vintage design inspiration.  (We do of course mean the royal we since it's only me.)  If you join me in my love of mid-century design, you too will appreciate Plan 59, "The museum and giftshop of mid-century inspiration."

Wednesday, November 24, 2010

Thanksgiving Break

Hello Friends!

I'm taking a some time with family for Thanksgiving, and I'll be back next week freshly stuffed and ready to go.  If you're still sprawled on the couch suffering from a turkey hangover, be sure to check out "15 Fresh Handmade Gift Ideas" Friday on HGTV (7/6c).  I had the pleasure of assisting on this shoot for a week, and I'm looking forward to seeing the final product.  (For more information, check out HGTV.com/handmade.)

Happy Thanksgiving!

Monday, November 22, 2010

Design Resource/Tool Box: Operation Black Friday

I do enjoy shopping on Black Friday.  (Not at 4 AM.)  There's a fun, community spirit between shoppers on that day.  I mostly go to people watch, but it's also a good time to pick up a few DIY tools at a discount.  I do try to avoid the urgent need to buy by planning my purchases ahead.  Last year I bought the drill, and this year I'm planning to buy a sewing machine at Wal-Mart.  I used to wait until Thanksgiving day to look at adds.  Dad and I drive around after lunch looking for a newspaper stand that's not out of papers.  We usually end up at some obscure gas station where we buy the last paper.  This year I looked up ads on on BlackFriday2010.com, so I could plan even further ahead.  This website aggregates all of the early release ads along with some unauthorized leaked ads.  I'll probably still drive around with Dad on Thanksgiving day though.  Some traditions just shouldn't be messed with.

Wednesday, November 17, 2010

Design Resource: Curbly


Reading Curbly was my first foray into the world of design blogs, and through it I have been introduced to many of my favorite bloggers' work.  It was launched by Bruno Bornztein in 2006 as a community for crafters and DIYers.  The editors both produce new content and aggregate quality content from a number of magazines and blogs into one location.


Tuesday, November 16, 2010

How-To: Easy Belt Organizer

I confess that I am not good at keeping my closet organized.  I have gradually been able to pinpoint solutions that help me stay on track.  It took me a long time to find a belt organization system that didn't end with a tangled knot of belts, or a time consuming storage process.  I found this project on Martha Stewart's website.  (I used more hooks than she did to save precious closet space in my old apartment.)  It takes a little time upfront, but it's very inexpensive, and it's been working for me for the past several months.  All you need is a wooden hanger, a drill, and some cup hooks.  Drill pilot holes in the bottom rail of a wooden hanger and insert a cup hook in each hole.  That's it!  Your belts will be easily accessible and tangle free.

Friday, November 12, 2010

Flea Markets--As If You Needed Another Reason to Love Them.


I'm still waiting for my fortune changing find.  While I keep looking, enjoy these amazing stories.

Thursday, November 11, 2010

Tool Box: Kuler

I love a free design tool, and this one is LOADS of fun to play with.  Adobe's online Kuler program is designed to help you generate color themes from various sources.

I especially enjoy creating themes from images.  Here's how it works:

1.) Open Kuler in your web browser and select "Create."

2.) Select "From an Image."

3.) Select either the "Upload" or the "Flickr" option.

4.) Upload your image.


5.) Browse the various color themes automatically extracted from your image or drag the point markers to create your own.

Tuesday, November 9, 2010

Frivolity: Put on a Happy Face in 3 Acts

Act One
It's not often that I see a commercial that I really truly love, but I always stop and watch this one from American Express:


Act 2
From the same people that brought you There I Fixed It, we have Happy Chair is Happy all about the emotional expressions of inanimate objects.

Act 3
I keep this cheese grater around because he has such a grate (haha!) smile.

Monday, November 8, 2010

Design Resource: One Kings Lane


There are a bunch of daily discount emails that you can subscribe to, but right now my favorite is One Kings Lane.  It's very Grouponesque, but with a focus on home decor.  I bought my shower curtain for half-price from One Kings Lane, and I look forward to seeing what's in the email every day.

Friday, November 5, 2010

How-To: Last Minute Quick Fix

I was invited to a triple birthday party this evening, and I spent a good bit of time after work tearing around my apartment trying to find my enclosure cards.  Out of time, I grabbed a pack of letter stencils from my supply closet.  They made lovely cards!  I used each birthday girl's first initial.  (I just can't label gifts for any more friends with the first initial 'A' until I pick up a new batch of stencils.)

Wednesday, November 3, 2010

How-To: No-Sew Textile Wall Art

I've seen people use fabric-filled embroidery hoops as inexpensive wall art pieces before, but it's also easy to personalize and add to the design simply by using some decorative trim.

Step-by-Step
1.) Remove the inner ring from an embroidery hoop and place it on your work surface.

2.) Place a piece of fabric on top of the ring.

3.) Arrange trim pieces to achieve your desired look.  (Be creative! There's no wrong way to do this!)

4.) Place the outer ring on top of the assembly and press it down over the inner ring.

5.) Stretch the fabric taut within the hoop assembly and tighten the screw to secure.  Trim off the excess fabric.

Tuesday, November 2, 2010

How-To: Cornucopia


Here's another recent, season appropriate project for Lowe's Creative Ideas that I had a lot of fun working on.  It's essentially a papier mache project, but instead of just using paper, you can also use textiles.  
Note: Because this was a Lowe's project, I used premixed wallpaper paste as my adhesive, but you can also use liquid starch.


STEP-BY-STEP

Step 1: Cut the hanger tab off a 1-pint funnel. Position the funnel at an angle on the base of an 8-inch plastic planter. Secure with masking tape.

Step 2: Use crumpled pieces of masking paper to smooth the transition between the funnel. Secure with masking tape. Repeat until you achieve your desired cornucopia shape.

Step 3: Tear small pieces of masking paper. Dip the pieces in wallpaper paste, and apply them to the cornucopia. Cover it inside and out. Allow to dry. 
Step 4: Cut two 3-inch-wide x 36-inch-long strips of burlap. Dip a strip of burlap into the paste. Twist the strip into a rope, and wrap it around the cornucopia. Repeat until the entire cornucopia is covered. Allow to dry. Place the cornucopia on your dining table, and fill it with harvest flowers, pumpkins, or vegetables.
Tip: You can make your decorative gourds last longer by applying a clear spray finish.

Monday, November 1, 2010

How-To+Frivolity: Not-So-Law-Abiding-Citizens

Props to Melody!  She makes a fabulous henchman!
I read this article a few months ago, and I couldn't believe that I hadn't broken this Alabama law before: In Alabama, it's illegal to wear a fake mustache that causes laughter in church.  Halloween seemed like a perfect opportunity to become an outlaw.

Make your own actionable accessory with some inexpensive materials.

Step-by-Step
1.) Draw a mustache shape on the back of a felt pad.  (Here are some suggestions just in case you're short on inspiration.)

2.) Use an Xacto and scissors to cut out your mustache shape.
3.) Apply a small amount of glue to the back of the mustache.  (I like this glue. It has a fine-point applicator, and it dries very quickly.)

4.) Attach a short dowel or unsharpened pencil to the mustache.
5.) Allow the adhesive to dry.